What Sea Wolf is
Sea Wolf is the optimisation game in the McKinsey Solve. You're crew on a ship, three stretches of ocean are contaminated, and for each one you assemble a treatment of three microbes whose combined profile matches what the site needs. It follows Red Rock Study and comes before the Sustainable Futures Lab on invitations that include it.
On the names: candidates and prep sites use Ocean Cleanup, Ocean Treatment and "the microbe game" for it. Most treat these as one game under different names. One prep site describes Sea Wolf as the successor to an earlier Ocean Cleanup game with the same reasoning and a new interface. Either way, if a guide says Ocean Cleanup, it's talking about this.
Timing, as reported consistently across prep sites and candidate accounts: about 30 minutes for all three sites, on Sea Wolf's own clock. Finishing early doesn't give you extra time in the next game. The tutorial before it is untimed. Sea Wolf is on every current invitation length (65, 85 and 95 minutes); see the invitation table in the Solve guide.
The setup
Every microbe has three numeric attributes on a 1 to 10 scale and one or more traits, which are yes-or-no properties. Every site sets a target range for each attribute, names one desired trait and one undesired trait. Your treatment for a site is exactly three microbes, and it's judged on the trio, not on any one microbe:
- For each attribute, the mean of your three microbes' values has to land inside the site's range.
- At least one of the three has to carry the desired trait.
- None of the three should carry the undesired trait.
Read the word mean twice. No individual microbe has to fit the range. A microbe with an attribute of 2 sits happily next to two 9s if the target is 6 to 7. That single fact is most of the game. Picking the three best-looking microbes and picking the best three microbes are different things.
The four steps, and what each one is watching
Each site runs through the same one-way sequence. Once you confirm a step you can't reopen it. The step names below are how candidates describe them; the on-screen labels vary.
Step 1: choose two profiling characteristics
You read the site's three ranges and two traits, then pick the two characteristics you'll prioritise. They can be two attributes, two traits, or one of each. The useful rule: profile the constraints that will be hardest to recover later, which usually means a range at the edge of the scale (1 to 2, 8 to 10) or the trait you can't afford to get wrong. Whether this choice changes which microbes you're offered later is not settled: one prep site says it might influence the starting prospect pool, two others say it doesn't. Treat it as a signal about how you read constraints, and don't spend more than a minute on it.
Step 2: categorise ten microbes
Ten microbes appear with their attributes and traits. For each you choose: use it for this site, save it for the next site, or reject it. On sites one and two the screen also previews something about the next site (a range or a trait), which is what makes "save for next" a real decision rather than a guess. Two things candidates report that surprise people: this step locks as you go, and the microbes you categorise here are not the ones you'll choose your final treatment from. The step is about reading constraints fast and planning one site ahead.
Step 3: build the prospect pool
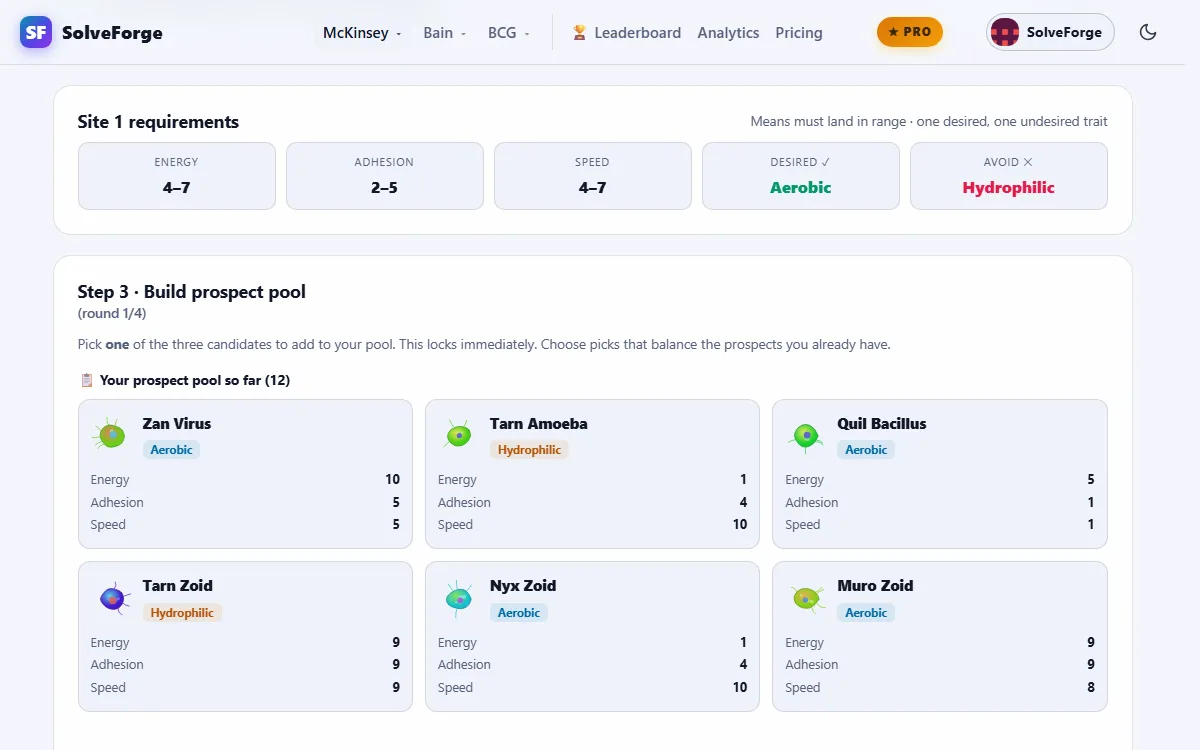
You're given six prospects, then add four more by choosing one from each of four groups of three. That leaves a pool of ten. This is the first step that directly controls your final options, so judge every candidate as a member of a future trio: a value outside the range can be exactly what you need to balance the two beside it, and a value inside the range can be useless if the microbe's trait or other attributes make the trio worse.
Step 4: create the treatment
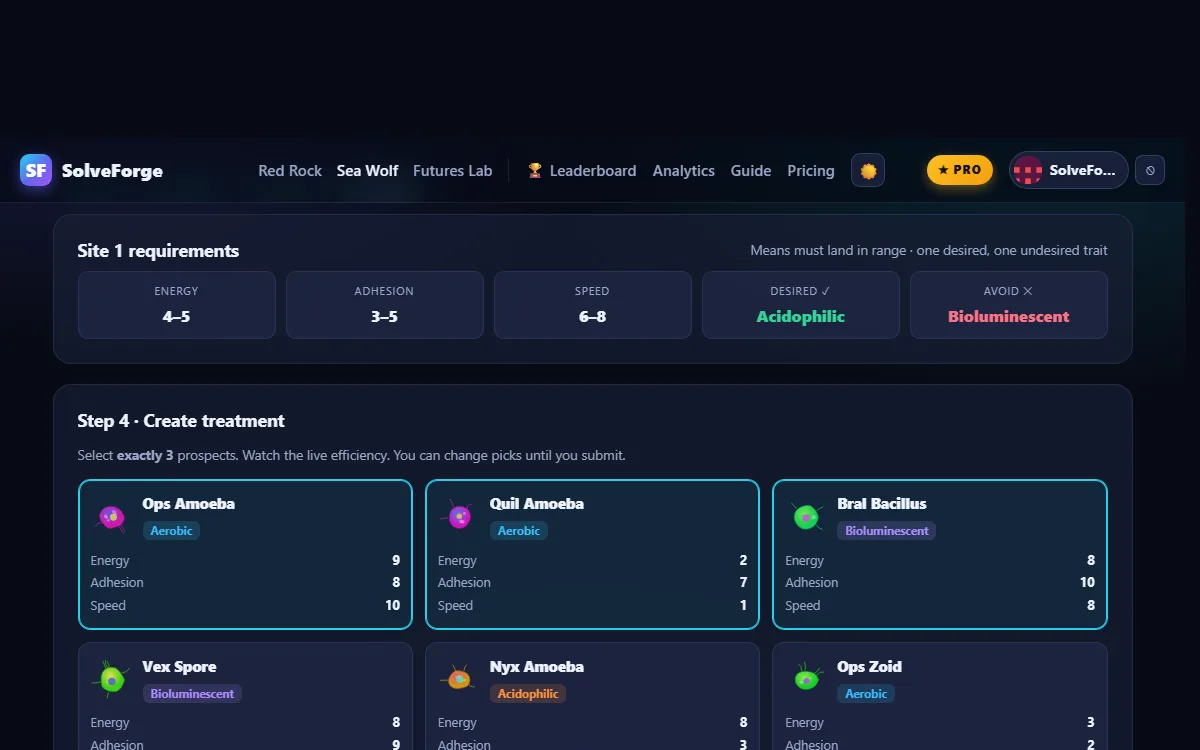
Choose three from the ten. This is where the score is decided. Check the three means against the ranges, confirm one desired-trait carrier and zero undesired-trait carriers, then submit. The real game gives you no running score while you pick, so do the arithmetic yourself before you commit.
Some guides also describe a short review of saved microbes at the start of sites two and three, sometimes called step zero. Others don't mention it. Our simulator includes one. If it appears, it's a quick keep-or-drop pass, not a new decision type.
How it's scored (as candidates report it)
McKinsey doesn't publish the scoring. What candidates and prep sites consistently describe is a treatment effectiveness figure per site that starts at 100% and loses 20% for each condition you miss:
- 20% for each of the three attributes whose mean falls outside the range (so up to 60% here);
- 20% if none of your three carries the desired trait;
- 20% if the undesired trait appears on any of your three.
Five conditions, 20% each. A clean treatment is 100%; miss one range and one trait and you're at 60%. Some pools don't allow a penalty-free trio at all. When that happens, take the trio with the fewest misses and move on; hunting for a perfect answer that isn't there is how site three runs out of time.
Two honest caveats. First, prep sites also report that Solve records how you work (the order you read things, how much you change your mind), and that this feeds a separate process signal McKinsey doesn't publish. Second, our own simulator uses a slightly stricter rule for the undesired trait (see how our simulator differs), so a score there isn't a prediction of a real score.
The averaging shortcut
Dividing by three under a clock is where mistakes creep in. Don't divide. Multiply the range by three and work with sums instead:
- Target 2 to 4 means the three values must sum to 6 to 12.
- Target 5 to 7 means a sum of 15 to 21.
- Target 8 to 10 means a sum of 24 to 30.
Two consequences follow. First, two microbes define exactly what the third must contribute: if the target sum is 24 to 30 and your first two add to 17, the third needs a 7 or more. Second, some microbes are dead on arrival. For a target of 8 to 10, the other two values can add to at most 20, so any microbe scoring below 4 on that attribute can't be rescued by anything. For a target of 2 to 4, the other two add to at least 2, so a value above 10 would be needed to break it from above; that never happens, but a 6 forces the other two to sum to 6 or less, which narrows your options fast. Run this check in step 3, before a hopeless microbe ever enters your pool. There's a longer version with more examples and a five-minute drill in the Sea Wolf averaging shortcut.
A full site, worked with real numbers
This site uses our simulator's attribute names (Energy, Adhesion, Speed) and invented microbes. The real game's names rotate; the decision pattern is what to learn.
The site brief
| Requirement | Target | Sum of three |
|---|---|---|
| Energy | 2 to 4 | 6 to 12 |
| Adhesion | 5 to 7 | 15 to 21 |
| Speed | 8 to 10 | 24 to 30 |
| Desired trait | Aerobic | at least one |
| Undesired trait | Heat-resistant | none |
Two ranges sit at the edges: Energy low, Speed high. Those are the ones that will hurt. Any microbe with Speed below 4 is out before we start; any microbe with Energy above 6 needs two very low partners.
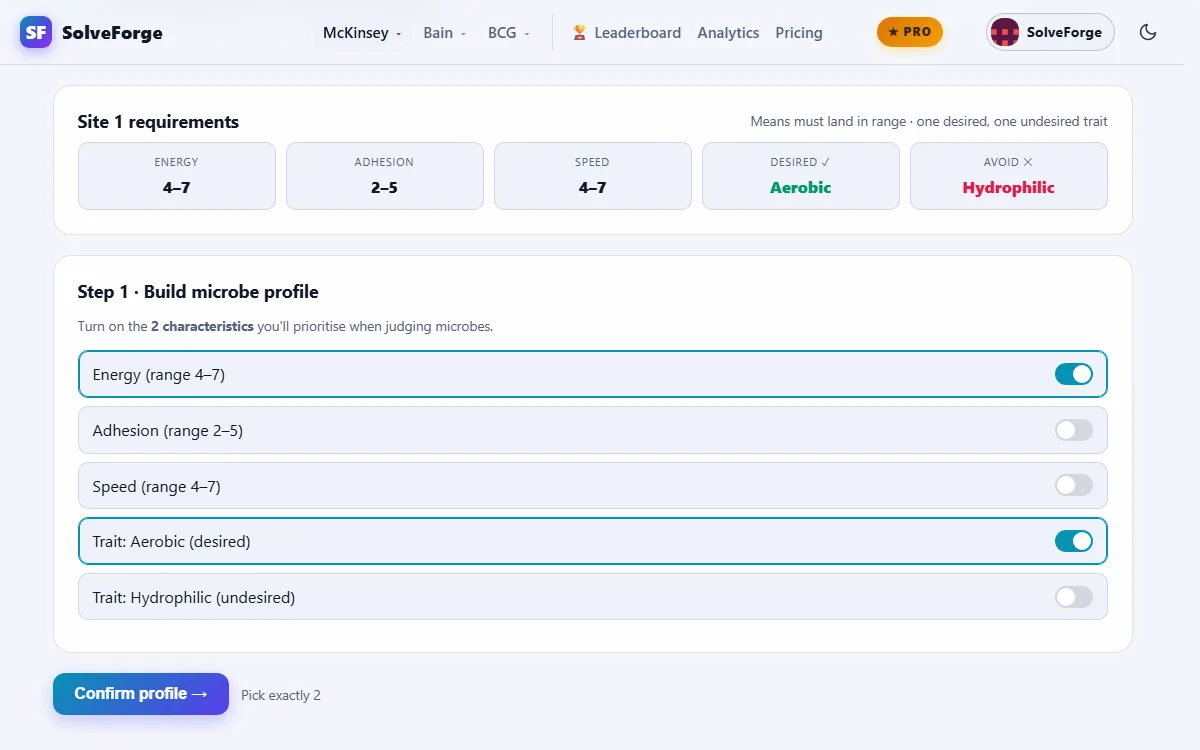
Step 1: profile
Speed (8 to 10) is the hardest constraint to recover, so it's the first pick. For the second, the undesired trait: a Heat-resistant microbe anywhere in the final trio is a guaranteed penalty, and it's the easiest thing to miss when you're staring at numbers. Energy would be a reasonable second choice too. Under a minute, confirm.
Step 2: categorise
The preview says site two wants Adhesion in the 8 to 10 range. Ten microbes, values in the order Energy / Adhesion / Speed:
| Microbe | E / A / S | Trait | Call | Why |
|---|---|---|---|---|
| Nyx Coccus | 3 / 6 / 9 | Aerobic | Use here | Fits every range and carries the desired trait. |
| Bral Spore | 9 / 9 / 6 | Salt-tolerant | Save | Energy 9 is unusable here; Adhesion 9 is exactly what site two previews. |
| Tarn Phage | 2 / 5 / 2 | Aerobic | Reject | Speed 2 can't be rescued: the other two would need to sum to 22. The desired trait doesn't save it. |
| Vex Amoeba | 4 / 9 / 8 | Heat-resistant | Save | Undesired here, so never for site one. Adhesion 9 could matter at site two if its traits differ. |
| Quil Zoid | 1 / 6 / 10 | Hydrophilic | Use here | Energy 1 is below the range and that's fine: two partners summing to 5 or more fix it. Speed 10 is gold. |
| Muro Bacillus | 8 / 10 / 9 | Salt-tolerant | Save | Energy 8 forces two partners summing to 4 or less. Adhesion 10 is a site-two gift. |
| Sepi Virus | 3 / 7 / 7 | Aerobic | Use here | Speed 7 is one below range, easily lifted by a 9 and a 10. Second desired-trait carrier is useful insurance. |
| Rho Microbe | 10 / 2 / 3 | Bioluminescent | Reject | Wrong on all three attributes for this site and useless for the preview. |
| Doln Alga | 2 / 4 / 9 | Heat-resistant | Reject | Undesired here, and Adhesion 4 does nothing for site two. |
| Ops Coccus | 4 / 8 / 10 | Acidophilic | Use here | Adhesion 8 is one over, rescuable. Also fits the site-two preview, so "save" would be defensible. This is the kind of judgement call the step exists to watch. |
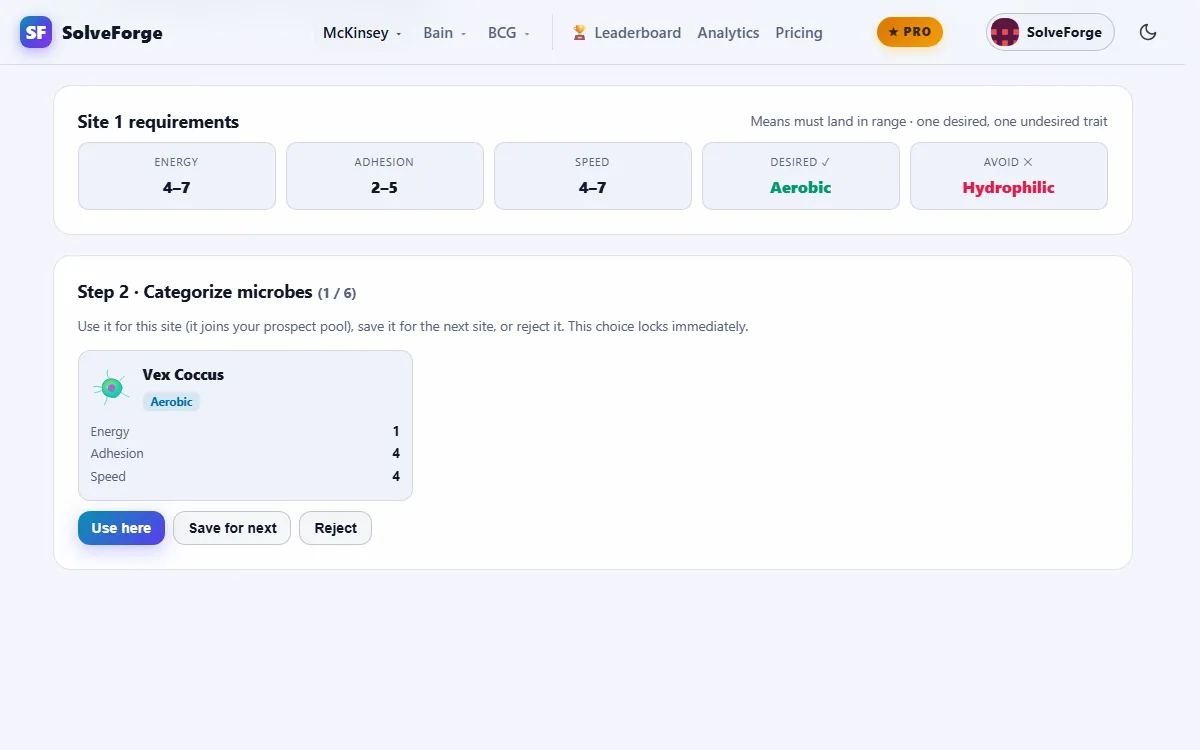
Step 3: build the pool
Six prospects are preloaded:
| Prospect | E / A / S | Trait | Read |
|---|---|---|---|
| Cyro Bacillus | 3 / 5 / 9 | Aerobic | Clean fit, has the desired trait. |
| Zan Spore | 2 / 6 / 8 | Salt-tolerant | Clean fit. |
| Vex Coccus | 9 / 9 / 9 | Heat-resistant | Big numbers, undesired trait. Bait. |
| Nyx Phage | 8 / 8 / 10 | Hydrophilic | Looks strong; Energy 8 poisons the Energy mean. |
| Muro Zoid | 4 / 7 / 10 | Heat-resistant | Perfect numbers, undesired trait. The quiet trap. |
| Tarn Amoeba | 1 / 6 / 6 | Aerobic | Speed 6 needs a 9 and a 9 beside it. Possible, not ideal. |
What the pool lacks: low-Energy, high-Speed microbes without the undesired trait. That's what to pick for in the four rounds.
| Round | Options (E / A / S, trait) | Pick | Why |
|---|---|---|---|
| 1 | Sepi Zoid 3/4/8 Hydrophilic · Ops Spore 7/7/7 Aerobic · Doln Virus 2/9/2 Aerobic | Sepi Zoid | Low Energy, Speed in range. Ops Spore's Energy 7 and Doln Virus's Speed 2 both break means. |
| 2 | Bral Alga 10/10/10 Heat-resistant · Quil Microbe 2/7/9 Bioluminescent · Rho Ciliate 5/1/1 Aerobic | Quil Microbe | Fits all three ranges. Bral Alga is the undesired trait with a halo. Rho Ciliate's Speed 1 is dead. |
| 3 | Cyro Zoid 6/6/6 Salt-tolerant · Nyx Alga 3/8/10 Acidophilic · Sepi Coccus 9/1/9 Aerobic | Nyx Alga | Adhesion 8 is one over and easily balanced. Cyro Zoid's Speed 6 and Energy 6 both pull the wrong way. |
| 4 | Tarn Volvox 1/5/10 Aerobic · Vex Spore 5/5/5 Heat-resistant · Zan Phage 4/6/4 Hydrophilic | Tarn Volvox | Desired trait, Speed 10, and an Energy of 1 that two partners can absorb. Zan Phage's Speed 4 is the floor, no margin. |
Step 4: the treatment
Ten in the pool. Screen the undesired trait first: Vex Coccus and Muro Zoid are out, whatever their numbers. Now the tempting trio and the right one.
The tempting trio, the three biggest numbers: Nyx Phage 8/8/10, Vex Coccus 9/9/9, Nyx Alga 3/8/10. Energy sum 20 (needs 6 to 12), Adhesion sum 25 (needs 15 to 21), Speed sum 29 (fine). No Aerobic microbe. One Heat-resistant microbe. That's four misses: 20% effectiveness. Every microbe in it looked strong on its own.
A clean trio: Cyro Bacillus 3/5/9 Aerobic, Zan Spore 2/6/8 Salt-tolerant, Quil Microbe 2/7/9 Bioluminescent.
- Energy: 3 + 2 + 2 = 7. Mean 2.33. In range (2 to 4).
- Adhesion: 5 + 6 + 7 = 18. Mean 6. In range (5 to 7).
- Speed: 9 + 8 + 9 = 26. Mean 8.67. In range (8 to 10).
- Aerobic: Cyro Bacillus. Heat-resistant: none.
100%. Not one of those three would be picked by someone hunting for the biggest numbers.
Another clean trio, to show a below-range value doing its job: Cyro Bacillus 3/5/9, Tarn Volvox 1/5/10, Nyx Alga 3/8/10. Energy 3 + 1 + 3 = 7, mean 2.33. Adhesion 5 + 5 + 8 = 18, mean 6. Speed 9 + 10 + 10 = 29, mean 9.67. Aerobic covered, no Heat-resistant. Also 100%, with an Energy of 1 and an Adhesion of 8 in it.
A near miss: Cyro Bacillus 3/5/9, Tarn Amoeba 1/6/6, Tarn Volvox 1/5/10. Speed 9 + 6 + 10 = 25, fine. Adhesion 16, fine. Energy 3 + 1 + 1 = 5, one short of 6. Mean 1.67, below the range. Three desired-trait carriers, all the right instincts, and 80%. One below-range value is a tool; two on the same attribute is a hole.
Sites two and three
The same four steps, with two differences. Microbes you saved at the previous site come back, so the categorise step at site one was partly an investment in site two. And the clock is shared: whatever site one cost you comes out of the other two. Candidates report the same points available at each site, so a perfect site one followed by a rushed site three is a worse run than three decent sites.
The mistakes that cost the most
- Judging microbes one at a time. The most common error and the one the walkthrough exists to kill. A 9/9/9 is worthless if its trait is undesired; a 1/6/10 can be the best microbe in the pool.
- Letting the undesired trait through. It's the easiest miss under time pressure because the numbers distract you. Screen for it before you look at a single attribute, in every step.
- Collecting the desired trait three times. You need one carrier. Filling two slots with desired-trait microbes that don't fit the ranges trades a certain 20% for nothing.
- Ignoring the next-site preview at step 2. It's the only information you get about site two before you're in it. Use it to decide between "save" and "reject" on borderline microbes.
- Adding a hopeless microbe to the pool at step 3. Run the sum check first. A Speed of 2 against an 8 to 10 target is dead no matter what you pair it with.
- Chasing 100% when the pool won't allow it. Take the fewest misses and move on. The time is worth more at the next site.
- Spending fifteen minutes on site one. Three sites, thirty minutes. Site one is the one you know least about, so it feels like it deserves the most time. It doesn't.
A time plan
Roughly ten minutes a site, split about like this: a minute on the brief and the profile, two to three on categorising, four to five on the pool rounds, and one to two on the treatment. Steps 3 and 4 carry the score, so if you have to squeeze, squeeze steps 1 and 2. Keep a two-minute buffer for site three.
How to prepare
- Learn the structure cold. Three sites, four steps, exactly three microbes, five conditions at 20% each. If you have to think about the rules on the day, you're spending time you don't have.
- Practise the sum shortcut until it's automatic. Range times three, then add. Do it on paper with random numbers for ten minutes.
- Run full timed sites. A single site untimed teaches the interface. Three sites on one 30-minute clock teaches the pacing, which is what people get wrong.
- After each run, find the step that cost you. Was it a trait you missed, a hopeless microbe you added to the pool, or a trio you eyeballed instead of summing? Fix that one thing before the next run.
- Play fresh scenarios. A replay of a scenario you've seen tells you about your memory, not your readiness.
How our simulator differs from the real game
We'd rather tell you than have you find out. Our simulator is built from public descriptions, not McKinsey's code, and it differs from what candidates report in a few ways:
- It categorises six microbes at step 2, not ten, and microbes you mark "use here" join your prospect pool. Candidates report that in the real game the categorised microbes and the prospect pool are separate.
- It penalises the undesired trait per microbe (two carriers cost 40%), where the reported rule is a flat 20% if the trait appears at all. Ours is stricter, which errs on the side of teaching you to screen for it.
- Each microbe carries one trait. Real microbes are reported to carry several yes-or-no traits.
- It includes a short review of saved microbes at the start of sites two and three; sources disagree on whether the real game does.
None of that changes the skill being practised: read the constraints, screen the traits, sum the attributes, think in trios, keep pace.
FAQ
How is Sea Wolf scored?
As candidates report it, each site's treatment starts at 100% effectiveness and loses 20% for each condition missed: each of the three attribute means outside its range, no desired-trait carrier, or the undesired trait present. McKinsey doesn't publish the scoring, and prep sites report a separate process signal based on how you work through the screens.
What is the ocean treatment game in McKinsey Solve?
Another name for Sea Wolf, the second Solve game, where you treat three contaminated ocean sites by selecting microbes. "Ocean cleanup", "ocean treatment" and "the microbe game" all refer to it. One prep site describes Sea Wolf as a renamed successor to an earlier Ocean Cleanup game with the same reasoning.
How many microbes do you pick in Sea Wolf?
Exactly three per site, chosen from a prospect pool of ten (six given, four you pick). The site is scored on the mean of those three across each attribute, plus the two trait conditions.
How long is the Sea Wolf game?
About 30 minutes for all three sites on its own clock, so roughly ten minutes a site. It's on every current Solve invitation length, alongside Red Rock Study.
What is the Sea Wolf averaging shortcut?
Multiply the target range by three and work with sums. A target of 8 to 10 means your three values must add to 24 to 30, which also tells you that any microbe below 4 on that attribute can't be rescued by the other two.
Does the step 1 profile choice change which microbes you get?
Sources disagree. One prep site says it might influence the starting prospect pool; two others say it doesn't. Treat it as a signal about which constraints you prioritise, pick the hardest ones to recover, and don't spend more than a minute on it.
Do I need an external solver for Sea Wolf?
No, and using one during the assessment would breach McKinsey's rules against outside tools. The arithmetic is three sums per site; the shortcut above and a few timed runs get most people there comfortably.
Is Sea Wolf harder than Red Rock?
Different. Red Rock rewards arithmetic speed and reading exhibits; Sea Wolf rewards reading constraints and thinking in combinations. Most people find one of them more natural, and it's worth knowing which before the day so you budget your practice time accordingly.
Is this the real McKinsey game?
No. SolveForge rebuilds the publicly documented mechanics for practice, and the section above lists where our version knowingly differs. The real content and artwork are McKinsey's.
Keep going
Before Sea Wolf comes the Red Rock Study guide; after it, on 85 and 95-minute invitations, the Sustainable Futures Lab. The full picture, including what your invitation length means, is in the McKinsey Solve guide. Ready? Start the free Sea Wolf scenario.